I know I've been silent for far too long...particularly since I was striving to blog regularly! (Haha!) But all this moving crap has really got me...I've been working on a few projects (which I'll share later!), but I wnted to take a moment and share this awesome giveaway! I love, love, love her work, and here is the link to her etsy shop. If I had the money, my house would be covered with these things, I swear! LOL
But now I need to go work on finishing up my HSKS spoilee's package!
----------------
Now playing: Rebecca Rudolf - My Hero
via FoxyTunes
Wednesday, November 10, 2010
Thursday, September 30, 2010
Wedding on the Brain
Ever since my BFF told me she was officially engaged, my brain has been swimming with wedding ideas...things I could make, suggestions and tips, things that need to be arranged...I really wish I was there in person right now, so I could truly be in the midst of all the excitement and be able to have a faster reaction time to everything! LOL Anyway, when I asked her what I could make for her, she liked the idea of handmade earrings (for herself and bridal party) and a necklace. So I've been happily up to my elbows in beads, throwing myself into making this jewelry to try and compensate for my absence. (Yeah, the compensating thing isn't really working...LOL) Anyway, here's a look at her earrings, designed to fit her color scheme (red & white):

That picture was deliberately taken with the sun shining right on it to show that the small beads are, in fact, red and not black. LOL Here is her necklace (using the exact same colors):


And here are the bridal party earrings (the pair that's got the extra strand on them are mine, as I'm the maid/matron of honor):

Side note: I'm not sure why the pictures are coming up so blurry...
Anyway, I made the bridal party earrings and just kept going (I have a tendency to get a little carried away...LOL)....

That picture was deliberately taken with the sun shining right on it to show that the small beads are, in fact, red and not black. LOL Here is her necklace (using the exact same colors):
And here are the bridal party earrings (the pair that's got the extra strand on them are mine, as I'm the maid/matron of honor):
Side note: I'm not sure why the pictures are coming up so blurry...
Anyway, I made the bridal party earrings and just kept going (I have a tendency to get a little carried away...LOL)....
And in so making the bracelets, I had to go fetch more beads from the craft store (horror of horrors, right? LOL) and came up with a cute little sentimental idea for the bride and bridal party (to be secret until presented at the wedding! LOL) which I needed to know everyone's favorite colors for. When I asked the other girls about it (with mentioning the earrings), one of them says "I don't have pierced ears." I must say I find that endlessly amusing...not that her ears aren't pierced, but that I have a pair of earrings for her non-pierced ears! LOL I'm now on a mission to see if I can find some clip-on variation for her.
So even through the insanity that is preparing to move to Germany and all the appointments and paperwork before me, yes, I still make time to craft. Why? Because I'll lose it if I don't...lol I'm serious. I'm not entirely sure why my thing lately has been beading, though. I've lost nearly all desire for yarn crafts at the moment...I'm not sure why...Hmmm But at least the crafting has continued!
----------------
Now playing: Glee Cast - Toxic (Glee Cast Version)
via FoxyTunes
Tuesday, September 21, 2010
Thank Heaven for Little Boys...
As I have previously mentioned, a lot of my friends (and friends of friends) have been having a lot of babies lately. Between that (and the fact that the boys have been a lot more fun now that they're 4 and 5 years old), the husband has really been heavily "hinting" at wanting to try for having a little girl. I'm not yet sure how I feel about that. I like being the only female in my house. lol We'll see, though...
Lately, the boys have been having those priceless moments...the ones you wish you could record the second they do something humorous so you can watch and re-watch it, giggling and laughing uncontrollably. Today, for instance, when C and I went to the bus stop to wait for A, C was so intrigued by every little thing around him; the flowers, the sunshine, the leaves on the ground...and today he started finding lizards! (Ah, little boy-dom!) He was trying to follow it and keep up with the little bugger (which is not an easy feat, considering how fast those little guys are!), and I was just enjoying watching him run back and forth on one side of the fence while he watched the lizard on the other side, trying to evade the imminent danger of the pre-schooler that would not leave him be. Then, for whatever reason, the lizard darted straight at C for a moment, which totally took the poor boy off guard, causing him to jump sideways and shriek! It was hilarious! I wish I had taken the camera to the bus stop! I don't even know how he managed to land on his feet, since 95% of the time he shows to have gotten my coordination. But land on his feet (and not his bum!), he did!
A, since having started school, has slowly been transforming and growing in new areas that astound me. he is very quickly grasping the concept of time, in the sense of days of the week and months of the year and where the holidays fall. Right now (given the time of the year, obviously), A is all about Halloween. I ordered their costumes off of the Internet the other day...they both want to be pirate captains! So any time they hear "Halloween" and /or "pirate," they begin this elaborate role play of being pirates! A gets very excited (and carried away!) , and while being a pirate captain, knocked over a puzzle box, spilling 100 pieces all over the floor. I asked him to please pick them up, and without missing a beat, he grabs the box, gets down on the floor, and says "Arrrrrrrr!!!! Me treasure!!!!", frantically scooping the pieces back into the "treasure chest."
I am thankful for my boys and the joy that they bring me, regardless of (and perhaps it is brought out more because of) the long, hard road I've traveled to get to where we are with them. I look forward to all the precious moments ahead....
----------------
Now playing: Rihanna - Only Girl (In the World)
via FoxyTunes
Friday, September 3, 2010
Bootie Button Flaps
So in getting to the bootie portion of the set my friend asked me about, I knew right where to turn for the main part of the bootie...the pattern for the crocheted sneaker booties! (I love that pattern! It is so cute!!!) I stopped after doing the 5th row of the body of the slipper, and then added on one row of sc all the way around to make it a smidgen taller and more narrow.

(I'm thinking maybe I should have used a smaller hook for a newborn size...these things'll last a while, unless the kid's got monster feet! LOL) From there I improvised my own little flap that will button on to hold the bootie on those itty-bitty feet. And now all I have to do is go find more buttons! (Here I come, craft store!) Here are the button flap instructions:

ch8, sc in 2nd ch from hook and in next 5 chs; 2sc in last ch, 2 sc in other side, working around the end of the chain to work in the round. sc in next 5 ch, 3sc in last ch, sl st to join.
round 2: ch1, 2 sc in first st, sc in next 5 sts, 2 sc in next st, sc in next 2 sts, 2 sc in next st, sc in next 5 sts, 2sc in next st, sc in next 2 sts, sl st to join
round 3: ch 1, single crochet in same stitch and in each of the next 6 stitches after, 2sc in next st, ch 4, sk next 2 stitches and 2sc in following st, sc in next 7 sts, 2 sc in next st, ch4, sk 2sts, 2 sc in next st, sl st to join, finish off, weave in ends.

The selling of projects resulting in use of this pattern is permitted, but please don't sell the pattern itself, and always provide the link/URL to the pattern where you sell it so others can enjoy crafting as well!
----------------
Now playing: Thierry Amiel - Je Regarde La-Haut
via FoxyTunes
(I'm thinking maybe I should have used a smaller hook for a newborn size...these things'll last a while, unless the kid's got monster feet! LOL) From there I improvised my own little flap that will button on to hold the bootie on those itty-bitty feet. And now all I have to do is go find more buttons! (Here I come, craft store!) Here are the button flap instructions:
ch8, sc in 2nd ch from hook and in next 5 chs; 2sc in last ch, 2 sc in other side, working around the end of the chain to work in the round. sc in next 5 ch, 3sc in last ch, sl st to join.
round 2: ch1, 2 sc in first st, sc in next 5 sts, 2 sc in next st, sc in next 2 sts, 2 sc in next st, sc in next 5 sts, 2sc in next st, sc in next 2 sts, sl st to join
round 3: ch 1, single crochet in same stitch and in each of the next 6 stitches after, 2sc in next st, ch 4, sk next 2 stitches and 2sc in following st, sc in next 7 sts, 2 sc in next st, ch4, sk 2sts, 2 sc in next st, sl st to join, finish off, weave in ends.
The selling of projects resulting in use of this pattern is permitted, but please don't sell the pattern itself, and always provide the link/URL to the pattern where you sell it so others can enjoy crafting as well!
----------------
Now playing: Thierry Amiel - Je Regarde La-Haut
via FoxyTunes
Newsie Baby
So I have a lot of friends lately that are getting married and having babies. Yay! I'm so happy for them all! Sadly, though, I cannot keep up with making them all handmade gifts. :( That makes me sad. :( However, one of the expecting said friends showed me a picture of a super cute hat and bootie set, and asked if there was any way I could make something similar. What I found on Ravelry wasn't quite what I was looking for, so I improvised and decontructed it as best I could from a photo, and ended up with this adorable hat!:

Baby Newsie Hat
Size I/5.50mm hook
Worsted/Aran weight yarn (around 28 grams/1 ounce
3/4" button
Round 1: In magic loop, ch2, 12hdc; sl st to join (12 sts)
R 2: ch 2, 2hdc in each hdc around, sl st to join (24 sts)
R 3: ch 2, *hdc in hdc, 2 hdc in next hdc,* repeat from * to * around, sl st to join (36 sts)
R 4-11: ch 2, hdc in each hdc around, sl st to join (36 sts)
Brim:
Row 12: ch2, hdc in same stitch, hdc in next 6 sts, 2hdc in next hdc, hdc in next 7 sts (16 sts), turn
Row 13: ch2, hdc2tog twice (taking the first 4 sts), hdc in next 4 sts, 2hdc in next hdc, hdc in next 3 sts, hdc2tog twice (taking the last 4 sts) (13 sts), turn
Row 14: ch2, hdc2tog, hdc in next 9 hdc, hdc2tog, (11 sts) finish off
Re-attach yarn on any stitch of the hat's body, Sc in each hdc around. When you get to brim, do a sc decrease over last stitch before brim, corner where brim meets hat body, and the first hdc of the brim to form a corner, sc up the side of the brim, 3 sc in first st of on the last row of the brim to form a corner, sc across to the other side of the brim, forming a 3sc corner at the other side, sc down the other side side, dec over the same 3 stitches to form the final corner, and sc in each hdc around to where you attached the yarn. sl st to join and fasten off. Weave in ends.
Button flap:
ch 22, dc in 5th from hook and dc across (18 dcs & ch 4), attach and finish off. The "hole" made by the chain stitches at the end is the buttonhole. Attach the flap at one side of the brim, sew the button on the opposing side, and button down.
Ta-da! Baby Newsie Hat is complete! :D
The selling of projects resulting in use of this pattern is permitted, but please don't sell the pattern itself, and always provide the link/URL to the pattern where you sell it so others can enjoy crafting as well!
----------------
Now playing: Kerli - Walking On Air
via FoxyTunes
Cute, huh?! Want in on my secret? ;) It's really quite simple. Here you go!
Baby Newsie Hat
Size I/5.50mm hook
Worsted/Aran weight yarn (around 28 grams/1 ounce
3/4" button
Round 1: In magic loop, ch2, 12hdc; sl st to join (12 sts)
R 2: ch 2, 2hdc in each hdc around, sl st to join (24 sts)
R 3: ch 2, *hdc in hdc, 2 hdc in next hdc,* repeat from * to * around, sl st to join (36 sts)
R 4-11: ch 2, hdc in each hdc around, sl st to join (36 sts)
Brim:
Row 12: ch2, hdc in same stitch, hdc in next 6 sts, 2hdc in next hdc, hdc in next 7 sts (16 sts), turn
Row 13: ch2, hdc2tog twice (taking the first 4 sts), hdc in next 4 sts, 2hdc in next hdc, hdc in next 3 sts, hdc2tog twice (taking the last 4 sts) (13 sts), turn
Row 14: ch2, hdc2tog, hdc in next 9 hdc, hdc2tog, (11 sts) finish off
Re-attach yarn on any stitch of the hat's body, Sc in each hdc around. When you get to brim, do a sc decrease over last stitch before brim, corner where brim meets hat body, and the first hdc of the brim to form a corner, sc up the side of the brim, 3 sc in first st of on the last row of the brim to form a corner, sc across to the other side of the brim, forming a 3sc corner at the other side, sc down the other side side, dec over the same 3 stitches to form the final corner, and sc in each hdc around to where you attached the yarn. sl st to join and fasten off. Weave in ends.
Button flap:
ch 22, dc in 5th from hook and dc across (18 dcs & ch 4), attach and finish off. The "hole" made by the chain stitches at the end is the buttonhole. Attach the flap at one side of the brim, sew the button on the opposing side, and button down.
Ta-da! Baby Newsie Hat is complete! :D
The selling of projects resulting in use of this pattern is permitted, but please don't sell the pattern itself, and always provide the link/URL to the pattern where you sell it so others can enjoy crafting as well!
----------------
Now playing: Kerli - Walking On Air
via FoxyTunes
Monday, August 9, 2010
How on earth....?
I was so good about blogging there for a spell, and then all of the sudden I post nothing in months! I've noticed that is a trend with me, though. I don't tend to be the kind of person that does things (blogging and otherwise!) on a schedule. I actually have a hard time with routines. I'm not sure why. My mom says she's that way, too, so maybe it's some genetic trait...I think it stems from the desire to explore the world...going by the seat of my pants and changing plans on a whim? Yeah, I can so do that. (Though it's infinitely easier and less of a hassle when it's solely me and doesn't involve my kids...LOL) Anyway, I promised to have the tutorial for the potions book up almost 2 months ago now. Yikes! Between previously being on a posting binge, before I could recover from the blogging silence I had succumbed to, it was suddenly time to prepare for my husband's return from his 6+ month deployment to Afghanistan (which preparations seemed never-ending), then dealing with the actual homecoming, and now the family reintegration bit. (Ah, if it were only all smiles and sunshine...adjusting to change is not easy...at least, certain changes...) But he's been home for 2 weeks now (hooray!) and it's about time for him to head back to work! Hopefully, once he starts working his 5 day week again, things will settle down here at home for a bit. Then the older one starts kindergarten in September...right before we move in November! And on top of all that, I'm still actively participating in HSKS! Oi! So I had every intent of post photos and instructions on how I made the Potions book, but as you can see, I've been a bit overwhelmed lately. I still even have everything set up and laid out to do it all, too! LOL Let's aim for it to be posted by the end of the month, shall we? ;)
----------------
Now playing: Grits/Tobymac - Ooh Aah
via FoxyTunes
----------------
Now playing: Grits/Tobymac - Ooh Aah
via FoxyTunes
Friday, June 18, 2010
Lunch time!
Whew! I have been up since 5am today (which in and of itself is a rarity!), without it needing to be for an appointment or anything! I decided to make the best use of my day and clean. Well, that and the fact that I really need to prepare for my husband coming home from deployment and I may also have a friend coming down from Germany to visit and staying with me, so cleaning is most definitely in order! But now it's time for lunch! Nomnomnomnom! I figured that while my boys are occupied with stuffing their faces I could justify a few minutes on the computer. :)
I've noticed a few of my other mom friends share all these phenomenal recipes, but personally, I don't usually get around to trying them. (Which really is a pity, since they do truly look to be tasty...) I'm not a cook. I do not enjoy food prep. Which, if you take into consideration my employment history, is actually ironic. I like to bake. Cakes, cupcakes, muffins, pies....YUM! That's the sort of thing I enjoy playing around with in the kitchen. Sadly, that does not make for good eating. (And on top of that, my oven is gas...I have discovered I hate baking with a gas oven. It's all well and good for the stove top, but I like to bake with electricity!) So I'm stuck with cooking, regardless. So what does a military wife whose husband is deployed and has to cook for two "half-people" resort to? Lots of easy meals. Boxed mac & cheese, cereal, and sandwiches. Lots and lots of sandwiches. Bologna, grilled cheese, PB&J's, tuna fish...sandwiches. But how do you keep from feeling like you're just preparing the same thing over and over and over and over, day after day after day? Especially when your kids are going through growth spurts and are determined to pester to be fed every 1-2 hours? My mom had the perfect solution: cookie cutters!!! Now any time that's sandwich time in our house is a happy time for the boys. They love picking from my plethora of cookie cutters to make shapes of their sandwiches! And as I do like to bake (and do often!), there are shapes aplenty!
The cookie cutters I have are kid-friendly, since they enjoy making cookie shapes as well, and are plastic and about an inch tall.


My little guys are all about cutting the shapes themselves, and because of the cutters being plastic, they love that they're able to!

The bat is one of their favorites, thanks to Batman! LOL So how do I get them to eat all the excess? I tell them they have to also eat all of the "hole" that they made, too, or else they can't have a shape in their sandwich next time. Works like a charm!


I will never be too old for tips from my mom! But now, since lunch time is sadly over, it's time to get back to cleaning...
----------------
Now playing: Katy Perry - California Gurls (feat. Snoop Dogg)
via FoxyTunes
I've noticed a few of my other mom friends share all these phenomenal recipes, but personally, I don't usually get around to trying them. (Which really is a pity, since they do truly look to be tasty...) I'm not a cook. I do not enjoy food prep. Which, if you take into consideration my employment history, is actually ironic. I like to bake. Cakes, cupcakes, muffins, pies....YUM! That's the sort of thing I enjoy playing around with in the kitchen. Sadly, that does not make for good eating. (And on top of that, my oven is gas...I have discovered I hate baking with a gas oven. It's all well and good for the stove top, but I like to bake with electricity!) So I'm stuck with cooking, regardless. So what does a military wife whose husband is deployed and has to cook for two "half-people" resort to? Lots of easy meals. Boxed mac & cheese, cereal, and sandwiches. Lots and lots of sandwiches. Bologna, grilled cheese, PB&J's, tuna fish...sandwiches. But how do you keep from feeling like you're just preparing the same thing over and over and over and over, day after day after day? Especially when your kids are going through growth spurts and are determined to pester to be fed every 1-2 hours? My mom had the perfect solution: cookie cutters!!! Now any time that's sandwich time in our house is a happy time for the boys. They love picking from my plethora of cookie cutters to make shapes of their sandwiches! And as I do like to bake (and do often!), there are shapes aplenty!
The cookie cutters I have are kid-friendly, since they enjoy making cookie shapes as well, and are plastic and about an inch tall.
My little guys are all about cutting the shapes themselves, and because of the cutters being plastic, they love that they're able to!
The bat is one of their favorites, thanks to Batman! LOL So how do I get them to eat all the excess? I tell them they have to also eat all of the "hole" that they made, too, or else they can't have a shape in their sandwich next time. Works like a charm!
I will never be too old for tips from my mom! But now, since lunch time is sadly over, it's time to get back to cleaning...
----------------
Now playing: Katy Perry - California Gurls (feat. Snoop Dogg)
via FoxyTunes
Tuesday, June 15, 2010
Unraveling Divinity
I absolutely love Rheatheylia's designs. I adore her crocheted Cable Hat, am a fan of her Mesh Hat, and I have made the Divine Hat sooooooo many times! I have noticed, though, that on Ravelry not everyone finds them as easy as I do, and often have similar issues in getting the transition of reading the pattern to come out properly through their fingers. Because of this (and because I think everyone should love making the Divine Hat as much as I do! LOL), I am going to try and make some clarifications through photographs in this post. :) (Note: This is all written in US crochet terminology. For a UK translation, there is a nifty little "translator" here.) In the following photographs, I am using sport weight yarn cotton yarn and a size G/4.00mm hook to make a baby version of the hat.
Ok, so here we go...first off, I'll address the "how-to" of front post double crochet (fpdc). After you chain 2 to begin the next round, you insert the hook to the right of the post you want to work around:


The placement for the instructions "dc in the first space between fpdc and dc" (italics mine) looks like this:


I had noticed that one or two people actually made their hats spiral in the opposite direction, and tried something out to see if it produced the same effect, and sure enough, it did! If you group your double crochets on the other side of the section, so that it goes "fpdc, hole, dcs, fpdc," then the spiral will go in the other direction.


Ok, so here we go...first off, I'll address the "how-to" of front post double crochet (fpdc). After you chain 2 to begin the next round, you insert the hook to the right of the post you want to work around:
Bring the hook behind the post, and back out on the other side of said post:
You will then yarn over, pulling the loop up behind the post, and proceed to finish out the double crochet as normal.
For the rounds of the pattern that read: "dc in the space between fpdcs", the placement of the double crochets is here:
For the rounds of the pattern that read: "dc in the space between fpdcs", the placement of the double crochets is here:
When the single double crochet is sandwiched between two fpdc, it looks like this:
The placement for the instructions "dc in the first space between fpdc and dc" (italics mine) looks like this:
Notice that the fpdc is immediately to the right of the stitch, and that there is another space in between the previous row's dc and next fpdc. You skip over that second space and go immediately into the following fpdc, leaving a small "hole" (which looks less "hole-y" and more "lacy" when the hat is completed), like this:
Here's a better shot of described "hole":
The "hole" makes it look a little uneven and unbalanced, but it's okay, because that's how it's supposed to look, and what will, in the end, create the spiral effect of the finished object. : )
In the line of directions that reads: "2 dc in the first space between fpdc and dc" (again, italics mine), you are using the exact same technique as the previous row, you're just giving your lonesome, solitary double crochet a friend. : )
In the line of directions that reads: "2 dc in the first space between fpdc and dc" (again, italics mine), you are using the exact same technique as the previous row, you're just giving your lonesome, solitary double crochet a friend. : )
The same goes for the "3 dc in the first space between fpdc and dc" and the "4 dc in the first space between fpdc and dc":
As you can see, you simply skip over all the double crochets in the previous row. The only place you put the stitches (aside from the fpdc's) is immediately after said fpdc and before the previous row's grouping of normal dc's. The "hole" that this leaves is what pulls the next fpdc to the side, creating the spiral effect.
I had noticed that one or two people actually made their hats spiral in the opposite direction, and tried something out to see if it produced the same effect, and sure enough, it did! If you group your double crochets on the other side of the section, so that it goes "fpdc, hole, dcs, fpdc," then the spiral will go in the other direction.
I hope that these pictures were helpful! If you have any other questions about it, let me know and I'll try my best to explain it! : )
----------------
Now playing: Rihanna - Take a Bow
via FoxyTunes
----------------
Now playing: Rihanna - Take a Bow
via FoxyTunes
Sunday, June 13, 2010
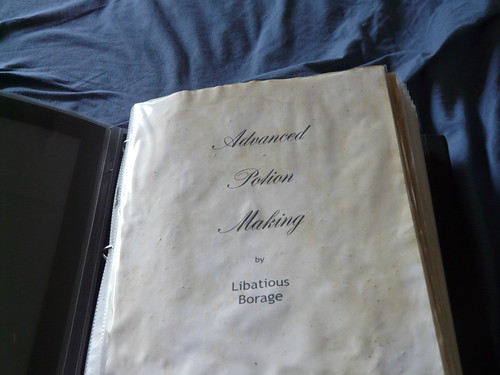
Advanced Potion Making
Looking back at the kit I made for Miss Clovenhoof, my favorite item of the entire thing is, hands down, the book. In fact, that book may just be the coolest thing I've ever made. In the history of ever!
A friend asked me which tutorial I used (since she was so impressed with the final result...as was I!), and I started with using a tutorial, but ended up kind of doing my own thing. LOL I promised her I'd post it here on my blog, but I've realized I should have more pictures for it. (Well, mostly for my sake, as I'm a picture fiend...LOL) So I think I'll be tea-aging some more paper within this next week and then I can take pics as I go and share them here! :D
----------------
Now playing: Shakira - Waka Waka (This Time for Africa) [The Official 2010 FIFA World Cup Song] {feat. Freshlyground}
via FoxyTunes

----------------
Now playing: Shakira - Waka Waka (This Time for Africa) [The Official 2010 FIFA World Cup Song] {feat. Freshlyground}
via FoxyTunes
Saturday, June 12, 2010
Clara's Potions & Notions Pouch
I am so super excited!!!! April finally got the kit I sent her for the HSKS10 swap! I had so much fun putting that kit together! (You can see her gush about it over here, at her Potter-esque blog.) I absolutely love to give things to people, most especially when I know they get some happiness out of it. :) But since one of the smaller items in her kit was a "pattern" of my own design, and the second time I've made a pouch like it, I figured it was high time I posted how I made it! (If for no other reason, then it can appease my OCD tendencies in having a pattern to link to on my Rav project page! LOL) So here's how I did it (with UK terms in parentheses)!

Clara's Potions & Notions Pouch
Size H (5.00mm) hook, worsted (aran) weight yarn
Note: This pouch is worked back and forth, not in the round, and is then seamed together.
chain 32
Row 1: hdc (htr) in 3rd chain from hook and across (30 hdc [htr]), ch 2, turn.
Rows 2-12: hdc (htr) across (30 stitches), ch 2, turn
Row 13: *hdc (htr), ch 1, sk next stitch* across, ending with a hdc (htr) in top of the previous row's ch 2; ch 2, turn
Row 14: hdc (htr) in each hdc (htr) and ch stitch across (for a little more of a "frill" look, you can put 2 hdc/htr into each stitch instead, as I did with the pouch pictured above, totaling 62 sts across on row 14)
DO NOT FINISH OFF
Fold the panel in half, making the width of the pouch 15 stitches, and sl st down the side and across the bottom (foundation chain row) to seam it into a pouch. Finish off and weave in ends, turn right side out, and add a ch-50 drawstring or ribbon of your choice, weaving it into the "holes" at the top of the pouch.
For the pouch pictured above, I also added a sc (dc) trim in a contrasting color after the seaming, totaling 60 stitches around the top.
The other pouch I previously made was done the same, except I only made it 28 stitches wide, instead of 30, and it is 10 rows high (and without the "frill") as opposed to 14 and is "wearing" a ch-45 drawstring, making it a little smaller than the green pouch.

I don't mind if you sell projects resulting in use of this pattern, but please don't sell the pattern itself, and always provide the link/URL to the pattern where you sell it so others can enjoy crafting as well!
----------------
Now playing: Britney Spears, Shakira & Lady GaGa - Give Me 3 Paparazzies
via FoxyTunes
Clara's Potions & Notions Pouch
Size H (5.00mm) hook, worsted (aran) weight yarn
Note: This pouch is worked back and forth, not in the round, and is then seamed together.
chain 32
Row 1: hdc (htr) in 3rd chain from hook and across (30 hdc [htr]), ch 2, turn.
Rows 2-12: hdc (htr) across (30 stitches), ch 2, turn
Row 13: *hdc (htr), ch 1, sk next stitch* across, ending with a hdc (htr) in top of the previous row's ch 2; ch 2, turn
Row 14: hdc (htr) in each hdc (htr) and ch stitch across (for a little more of a "frill" look, you can put 2 hdc/htr into each stitch instead, as I did with the pouch pictured above, totaling 62 sts across on row 14)
DO NOT FINISH OFF
Fold the panel in half, making the width of the pouch 15 stitches, and sl st down the side and across the bottom (foundation chain row) to seam it into a pouch. Finish off and weave in ends, turn right side out, and add a ch-50 drawstring or ribbon of your choice, weaving it into the "holes" at the top of the pouch.
For the pouch pictured above, I also added a sc (dc) trim in a contrasting color after the seaming, totaling 60 stitches around the top.
The other pouch I previously made was done the same, except I only made it 28 stitches wide, instead of 30, and it is 10 rows high (and without the "frill") as opposed to 14 and is "wearing" a ch-45 drawstring, making it a little smaller than the green pouch.
I don't mind if you sell projects resulting in use of this pattern, but please don't sell the pattern itself, and always provide the link/URL to the pattern where you sell it so others can enjoy crafting as well!
----------------
Now playing: Britney Spears, Shakira & Lady GaGa - Give Me 3 Paparazzies
via FoxyTunes
Tuesday, May 4, 2010
Baby-palooza!
Wow! I recently finished a Tiramisu Baby Blanket (complete with matching booties, mitts and a hat) for my sister-in-law to give as a gift to one of her pregnant professors. (She really only asked me to make a blanket, but I got a little carried away...LOL) And now a good friend from high school is now pregnant! I am so very excited! I've had an itch to make baby items (beyond what I'm donating to Stitches from the Heart...I like the personal feel of giving it to someone I actually know, every now and again), and she's giving me the perfect opportunity! I already went to Knit Picks and ordered yarn for Baby Cissell's things (even though she's not even due until November! LOL), but am a bit on-the-fence about what pattern to go with...I guess it's a good thing I've got some time! I was so excited, however, that I had to make something right off, and what better to make than a hat? It's super quick and easy and is very instant gratification! :) I got to try out a pattern from a friend (CelticMommy's Rib-Wrapped Baby Hat) while I was at it, and use some of the leftover yarn from the previous baby set I so recently finished!


Maybe it was just the fiber content, or maybe the hook size and yarn weight combination, but I wasn't all to pleased with the gaping holes or how little the fpdc's stood out from the rest of the hat. So I tried again with heavier yarn (that was 100% acrylic, as opposed to the 75% cotton/25% acrylic blend in the first hat), and played around a little with some color variation.
Yep, this pattern is good stuff. :) I'll definitely be making more of them!!!
Wednesday, April 28, 2010
YAY for the Leaky Cauldron!!!
I am so super excited!!!! I'm Leaky's featured crafter of the month!!!!!!!! I'm so honored and ridiculously giddy about the whole thing....

How insanely cool is that?!?!?!?!?!?!?!?!?!?! It makes me want to drop all my current WIPs and do some more Potter crafting! Hahahahaha! (As if I don't do enough of that to begin with...) I wish I could have shown my two most recent Potter crafting endeavors, though...but I can't because they're for a current running swap, and I don't want Miss Clara to see anything yet! I guess that just means I'll have to brag about it here after she's gotten her kit. ;) In the meantime, I'll just have to do my best to keep on keepin' on with my current WIPs, swap-related and preemie items alike...I'm working on getting a whole box of preemie items for HSKS' S.P.E.W.! But right now....it's actually bed time. It's been a long past few weeks. (We took a weekend trip to Tuscany, a day trip to Verona and A just turned 5!!! I've been busy with birthday presents and the party and cleaning up the wrapping paper that's everywhere....) So I guess I should try to get some sleep!!!
How insanely cool is that?!?!?!?!?!?!?!?!?!?! It makes me want to drop all my current WIPs and do some more Potter crafting! Hahahahaha! (As if I don't do enough of that to begin with...) I wish I could have shown my two most recent Potter crafting endeavors, though...but I can't because they're for a current running swap, and I don't want Miss Clara to see anything yet! I guess that just means I'll have to brag about it here after she's gotten her kit. ;) In the meantime, I'll just have to do my best to keep on keepin' on with my current WIPs, swap-related and preemie items alike...I'm working on getting a whole box of preemie items for HSKS' S.P.E.W.! But right now....it's actually bed time. It's been a long past few weeks. (We took a weekend trip to Tuscany, a day trip to Verona and A just turned 5!!! I've been busy with birthday presents and the party and cleaning up the wrapping paper that's everywhere....) So I guess I should try to get some sleep!!!
Sunday, March 21, 2010
Ribbed Crochet Preemie Hat
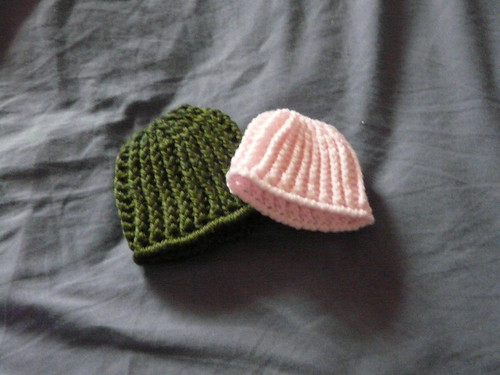
So in browsing the crochet preemie hats on Ravelry, I decided to have a go with this "10 minute" pattern. But for some reason, my hats came out much smaller than hers, and didn't really have and give or stretch to them, so I decided to do one of my own. :) So, without further ado, I give you my Ribbed Crochet Preemie Hat (the pattern is given in US terms, but there is also a UK termed version below it):
(I used Rheatheylia's Divine Hat join method...I love that join!)
To join each round: join with slip stitch around the first front post double crochet of previous round (or beginning ch 2 of the first round), ch 2, then fpdc down into the same front post double crochet you just did the slip stitch to (again, this will be a ch 2 for the beginning round). This pushes the ch 2 behind the fpdc you just made (ignore the ch 2, it doesn’t exist). This isn’t necessary, but it looks better than a standard ch2 and makes the join less obvious.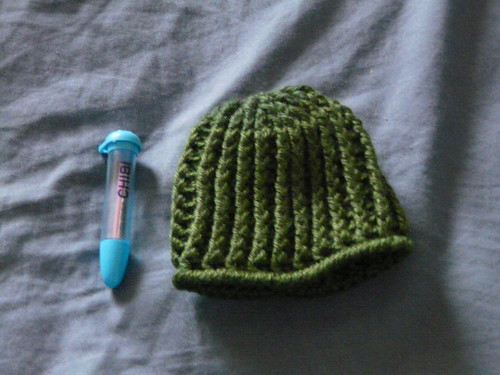
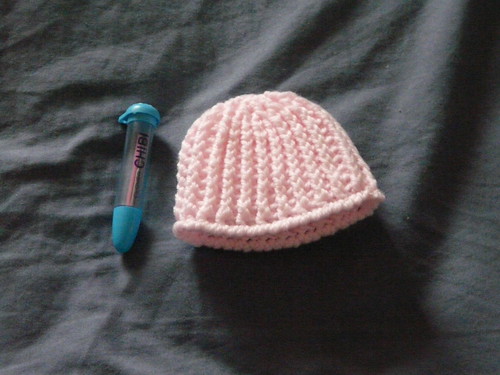
(The green is done in Caron's Simply Soft and the pink is done in Red Heart's Baby Soft yarn.)
I don't mind if you sell projects resulting in use of this pattern, but please don't sell the pattern itself, and always provide the link/URL to the pattern where you sell it so others can enjoy crafting as well!
(I used Rheatheylia's Divine Hat join method...I love that join!)
To join each round: join with slip stitch around the first front post double crochet of previous round (or beginning ch 2 of the first round), ch 2, then fpdc down into the same front post double crochet you just did the slip stitch to (again, this will be a ch 2 for the beginning round). This pushes the ch 2 behind the fpdc you just made (ignore the ch 2, it doesn’t exist). This isn’t necessary, but it looks better than a standard ch2 and makes the join less obvious.
Sport/baby weight yarn
Size G/4.25mm hook
fpdc = front post double crochet
bpdc = back post double crochet
R1: 11 dc in magic loop, join
R2: ch2, (fpdc in dc, dc in same st) around, join (22 sts)
R3: ch2, (2fpdc in fpdc, bpdc in dc) around, join (33 sts)
R4: ch2, (fpdc in fpdc, dc, fpdc in fpdc, bpdc in bpdc) around, join (44 sts)
R5: ch2, (fpdc in fpdc, bpdc in dc, fpdc in fpdc, bpdc in bpdc) around, join
R6-14: ch2, (fpdc in fpdc, bpdc in bpdc) around, join
R15: reverse sc around, join
Fasten off and weave in ends.
UK termed version:
To join each round: join with slip stitch around the first front post treble crochet of previous round (or beginning ch 2 of the first round), ch 2, then fptr down into the same front post treble crochet you just did the slip stitch to (again, this will be a ch 2 for the beginning round). This pushes the ch 2 behind the fptr you just made (ignore the ch 2, it doesn’t exist). This isn’t necessary, but it looks better than a standard ch2 and makes the join less obvious. The site I found this method at is linked above the US termed version.
Sport/baby weight yarn
Size G/4.25mm hook
fptr = front post treble crochet
bptr = back post treble crochet
R1: 11 tr in magic loop, join
R2: ch2, (fptr in tr, tr in same st) around, join (22 sts)
R3: ch2, (2fptr in fptr, bptr in tr) around, join (33 sts)
R4: ch2, (fptr in fptr, tr, fptr in fptr, bptr in bptr) around, join (44 sts)
R5: ch2, (fptr in fptr, bptr in tr, fptr in fptr, bptr in bptr) around, join
R6-14: ch2, (fptr in fptr, bptr in bptr) around, join
R15: reverse dc around, join
Fasten off and weave in ends.
(The green is done in Caron's Simply Soft and the pink is done in Red Heart's Baby Soft yarn.)
I don't mind if you sell projects resulting in use of this pattern, but please don't sell the pattern itself, and always provide the link/URL to the pattern where you sell it so others can enjoy crafting as well!
Saturday, March 20, 2010
Back to Preemie hats...
So the first hats I've made were knitted, following this lovely little pattern. It was the one I liked most out of the ones I saw on Ravelry. It was more than just a plain stockinette stitch cap, but still really simple.
But at the same time, to me personally, it didn't look much like a sprial. It didn't "lean" enough. So I made my own modifications and came up with these!
As you can see, it did come out a little bit shorter and wider than the original version, but I really like it! Besides, babies (even preemies!) come in all shapes and sizes, so I'm sure both styles will find heads to cover!
For anyone interested, here is the modified version I used of Bonnie Batten's Spiral Preemie Cap:
Cast on 56 sts, divide onto 3 DPN's. You may want to slip a stitch marker before the first stitch.
Rows 1 - 5:
Work in K2, P2 ribbing around.
Rows 6 - 8:
P1, (K2, P2) around, ending in a P1
Rows 9 - 11:
(P2, K2) around
Rows 12 - 14:
K1, (P2, K2) around, ending in a K1
Rows 15 - 17:
(K2, P2) around
Rows 18 - 20:
P1, (K2, P2) around, ending in a P1
Rows 21 - 23:
(P2, K2) around
Row 24:
K1, (P2tog, K2) around, leaving last st unknit; sl unknit st to beg of next round
Row 25:
(K2tog, P1) around
Row 26:
K2tog around to last st, K1
Row 27:
K2tog
At end of row 27, cut yarn leaving a long tail. Using a yarn needle, thread the yarn through the remaining stitches. Turn cap inside out and pull yarn tight. Tie securly. Weave in all ends.
Happy Knitting!!!


Friday, March 19, 2010
Making preemie hats
Wowzer! I haven't posted in ages! I've been keeping plenty busy since September, though, (which, in addition to another birthday, anniversary and Christmas, includes a trip to the States, the beginning of another deployment and the Ravelympics) and have plenty to blog about...if I would only take the time to. LOL
Recently one of the spouses in my husband's squadron e-mailed me a link to a site that promotes doing one nice thing a day for someone other than yourself, and one of them just so happened to be involving a charity called "Stitches From the Heart." And wouldn't you know, I've got 100% acrylic yarn out the wazoo that I am really trying to get rid of, and a fair amount of that being the soft or baby brands. So I've taken to making preemie hats. I found a knit pattern I liked pretty well, (though I like my modified version better, lol) but couldn't find a crochet one I liked so much that had some stretch and give to it. So I came up with my own! I'm super excited to share the pattern, but want to make sure it's intelligible and want it tested out before I post it, so keep your eyes peeled!
----------------
Now playing: Dommin - My Heart, Your Hands
via FoxyTunes
Subscribe to:
Posts (Atom)